How to Start with n8n Cloud in 2026: A Practical Setup Guide for Freelancers

As a PM and non-developer, I know the buzz of finding an automation tool that could free up hours each week — followed by the frustration of unclear costs and setup that feels more like sysadmin work than building solutions. Many freelancers and solo owners I talk to want to connect a few apps without learning Docker or decoding per-user pricing models. This guide walks through the exact steps to get started with n8n Cloud, from signing up to a simple, working workflow, so you can judge whether it fits your business before committing time or money.

Table of Contents

  1. Quick Summary: What You Get with n8n Cloud and What to Watch Out For
  2. Why n8n Cloud Matters for Small Business Owners Right Now
  3. Key Conditions, Costs, and Benefits You Should Verify
  4. Step-by-Step: From Sign-Up to Your First Automation
  5. Deciding If n8n Cloud Fits Your Solo Business Workload
  6. Checklist and Risks Before You Automate
  7. Frequently Asked Questions
  8. Wrap-Up

Quick Summary: What You Get with n8n Cloud and What to Watch Out For

n8n Cloud is the managed version of the open-source workflow automation tool, meaning you can sign up for a free trial directly at their cloud platform — no server setup required. You can visually connect apps like Google Sheets, Slack, email, and AI services, which opens up a lot of possibilities without writing code. However, the free trial comes with limits on execution volume and active workflows, and once it ends you’ll need a paid plan or you’ll have to switch to the self-hosted community edition.

For freelancers testing a few automations, this is the fastest way to see results. Just don’t forget to check the exact trial length and what’s included — the official learning path is a good place to scope the current offer before you hand over payment details.

💡 Before you commit
Visit the n8n learning path at Learning path | n8n Docs for the latest sign-up guides and to confirm the free trial duration and plan limits before you start.

Why n8n Cloud Matters for Small Business Owners Right Now

AI automation is moving from a nice-to-have to everyday toolkit for solo business owners, and many are looking for reliable ways to integrate apps without hiring developers. n8n stands out because it is open-source, which helps avoid the per-user price jumps that can hit teams on other platforms. The cloud option eliminates the barrier of setting up and maintaining a server, so you can explore automation in an afternoon — not over a weekend of debugging.

There is now a growing library of step-by-step tutorials and courses centered around n8n. The official learning path, for example, walks you through building real-world workflows and offers text and video courses. While you’ll still face a learning curve, the current cloud product is mature enough to be considered alongside Zapier or Make for a freelancer who values control and cost transparency.

Key Conditions, Costs, and Benefits You Should Verify

Before you create an account, it helps to understand what the cloud plan includes and how it stacks up against self-hosting. n8n Cloud handles hosting, updates, and basic security for you, but your monthly workflow execution limit will be tied to the plan you pick. Exact pricing and trial details are shown on the sign-up page; as of this writing, a free trial is available, and after that you’ll pay a recurring subscription.

The table below compares cloud and self-hosting in a way that matters to a solo operator. Keep in mind that if you only run a handful of automations, the convenience of cloud likely outweighs the small recurring cost. But if your volume grows or you need to keep sensitive data inside your own infrastructure, the self-hosted route might be more suitable.

Feature n8n Cloud Self-Hosted (Community Edition)
Setup time Minutes — just sign up Hours — requires Docker/npm and basic server knowledge
Maintenance Fully managed by n8n You manage updates, backups, and uptime
Cost Free trial, then monthly subscription (check current pricing) Free software; you pay for server resources (e.g., $6–$20/month on a VPS)
Scalability Limited by your plan tier Scales with your server hardware
Tech skill required Low — visual editor steps Medium — Docker basics and API handling

Step-by-Step: From Sign-Up to Your First Automation

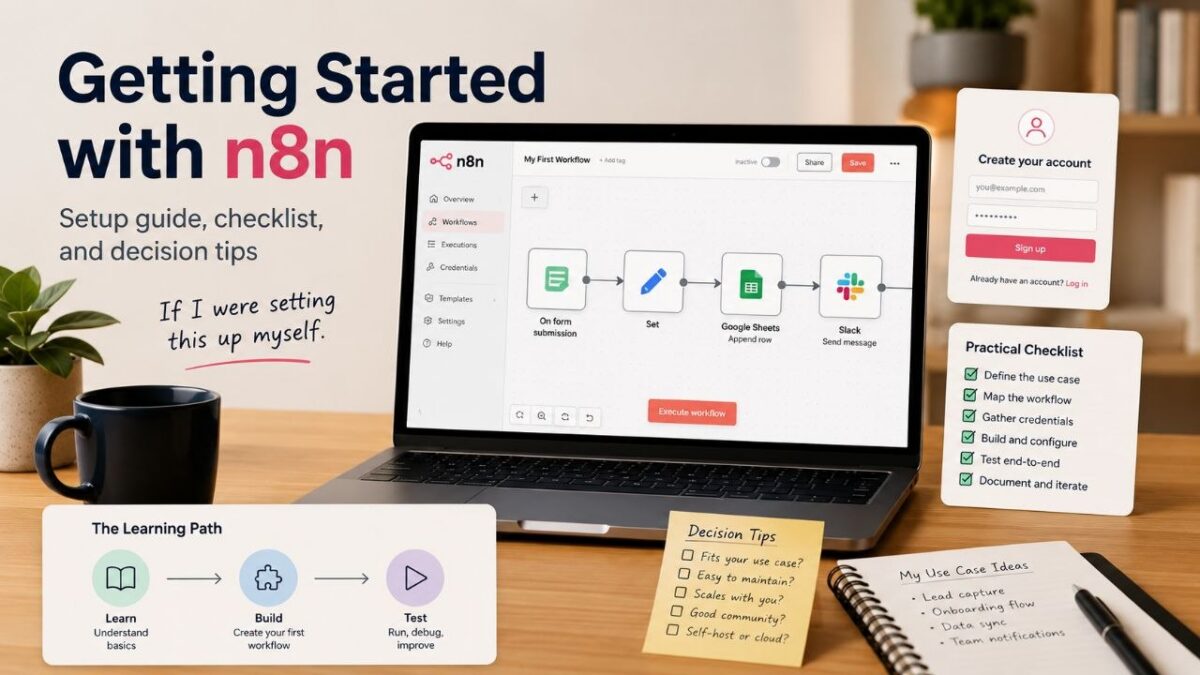
If I were setting this up myself for a small client project, I’d pick one simple, high-value use case to build first — like getting an alert whenever a new Google Form comes in. Here is the path I’d follow to go from zero to a working workflow in under an hour.

  1. Sign up and start your trial: Go to the n8n Cloud app and create an account. Once inside, you’ll land on the workflow overview page. Start the free trial when prompted — you won’t need a credit card immediately, but keep an eye on the trial expiration date shown in the dashboard.
  2. Create a new workflow and choose a trigger: Click ‘+ Workflow’ to open the editor. Drag the ‘Webhook’ node onto the canvas. This node will generate a unique URL; any data you send to that URL (for example, a test POST from a form) will start the automation.
  3. Add an action node that matters to your business: Let’s say you want new entries added to a Google Sheet. Search for the Google Sheets node, drag it after the webhook, and select ‘Append Row’. Authenticate with your Google account (a simple OAuth pop-up). Map the incoming webhook data to the correct spreadsheet columns.
  4. Test the workflow with real sample data: Click ‘Listen for test event’ in the webhook node. Then, from another browser tab or a tool like Postman, send a test request to the webhook URL with a sample payload. If everything is wired correctly, you’ll see the node turn green and the test row will appear in your sheet.
  5. Activate and monitor the first run: Once the test passes, click ‘Activate’ in the top-right corner. The workflow will now run automatically whenever data hits the webhook. Check the execution history tab to make sure each run completes without errors. If something breaks, n8n will show a red node and an error description — most early issues come from mismatched data fields.

💡 Quick help
If you get stuck on authentication or node configuration, the official quickstart guides at Learning path | n8n Docs provide a real-world example from beginning to end that you can follow alongside.

Deciding If n8n Cloud Fits Your Solo Business Workload

Not every freelancer needs the cloud plan, and not every project is suited for a managed service. I’d make the call based on three things: how many automations you plan to run, which integrations you rely on, and how comfortable you are with a platform that handles your data.

For a solo business owner, n8n Cloud makes the most sense when you run a few low-to-medium volume workflows and you value saving time over absolute cost optimization. If you need to process hundreds of thousands of rows or integrate with local databases, the cloud plan’s limits may frustrate you, and the self-hosted edition might be a better fit. Similarly, if your automations handle client-sensitive financial or health records, you’ll want to verify the cloud’s data residency and security posture before proceeding — the official n8n security docs are the place to check.

Checklist and Risks Before You Automate

Before you flip the switch on a production automation, run through these items. They come from real-world snags I’ve seen small teams hit when trying to move fast.

  • Note the trial end date and the monthly execution cap of the free trial and the cheapest paid plan.
  • Build and test one whole workflow end-to-end with sample data to confirm all node connections work.
  • Confirm that the third-party apps you need (email, CRM, calendar) have officially supported n8n nodes — if not, you may need to write a custom HTTP request node, which adds complexity.
  • Audit the data you’ll send through n8n Cloud. Avoid placing unencrypted sensitive information in workflows where you can’t control where it’s stored.
  • Set a calendar reminder for one day before the trial ends so you can decide to upgrade or export workflows for self-hosting.

💡 Biggest catch
The most common risk for independent users is missing the trial expiration and having critical automations shut off without warning. Plan your exit — either a paid plan or a self-hosted backup — before the trial clock runs out.

Frequently Asked Questions

Is n8n Cloud free?

It starts with a free trial. After the trial, you’ll need a paid subscription to keep using the cloud platform. The exact trial length and the features included are shown on the sign-up page, so it’s best to check there before starting.

Do I need to know how to code?

Basic automations are built with a visual drag-and-drop editor, so you don’t need to write code for common tasks like forwarding emails or logging form entries. More advanced flows may require some understanding of APIs and JSON, but you can learn as you go with the official tutorials.

Can I switch from cloud to self-hosting later?

Yes. You can export your workflows from n8n Cloud and import them into a self-hosted community edition running on Docker or npm. This gives you a safety net if you outgrow the cloud plan or want to avoid monthly fees.

What kind of simple automation should I build first?

Start with something like new form submissions saved to Google Sheets, or a Slack notification when a specific email arrives. These low-risk flows let you learn the editor and test the plan limits without touching critical processes.

How secure is n8n Cloud?

n8n Cloud is a managed service that handles server‑level security and updates. However, you are still responsible for the data you pass through your automations. Review n8n’s security documentation and avoid sending highly sensitive data in an unencrypted manner unless you’ve verified compliance with your own requirements.

Wrap-Up

If you’re a freelancer, solo founder, or side‑project builder looking to cut down on repetitive tasks without getting buried in setup, n8n Cloud gives you a low‑risk way to test workflow automation. Start with the free trial, follow the official quickstarts to build one simple workflow, and then evaluate whether the plan’s cost and limits match your long-term needs. Next, I’d check the n8n learning path and community forums for an existing template that fits your use case — you may not have to build from scratch.

Vibe Coding 2026: A Non-Developer’s Setup & Automation Walkthrough

You've probably seen the term vibe coding everywhere and wondered if it's just another hype cycle or something a solo business owner can actually use without a CS degree. The frustration is real: too many tools, unclear where to start, and the nagging fear that you'll break something you don't understand. This guide isn't a sales pitch—it's a practical walkthrough drawn from the latest available documentation and guides, showing you exactly what setup looks like and how to run a simple automation without writing code line by line. If I were setting this up myself for a freelance side project, here's what I'd check first.

Table of Contents

  1. What Vibe Coding Really Means (and What It Doesn't)
  2. Why This Matters for Freelancers and Solo Owners Right Now
  3. Key Benefits, Limitations, and What the Latest Guides Agree On
  4. From Setup to Running Automation: A Step-by-Step Expense Tracker Example
  5. How to Decide Where Vibe Coding Fits in Your Solo Workflow
  6. Checklist Before You Consider It Done — Common Pitfalls
  7. Frequently Asked Questions
  8. Sources and References
  9. Wrap-Up

What Vibe Coding Really Means (and What It Doesn't)

Google Cloud's latest definition (updated March 2026) describes vibe coding as a loop: you describe what you want, the AI generates code, you run it, see what happens, then give feedback to refine—repeating until it works. It's not a one-shot magic bullet. Andrej Karpathy coined the term in early 2025, and by 2026 the practice has matured enough that even a non-developer PM like me can follow a structured process. From the guides I read, the core pattern isn't 'AI does everything'; it's 'you steer the AI through conversation, testing, and iteration.' That means you still need to think clearly about what you're building and how to test it.

One critical exception: if you're building something that handles customer data, payments, or anything security-sensitive, vibe coding alone probably isn't enough. Several experienced voices note that most generated code needs security review and manual hardening before production (Valletta Software, April 2026). That's not a reason to avoid it—just a warning that I'd take seriously if I were putting a tool in front of paying clients.

💡 Realistic expectation
Vibe coding speeds up prototyping and small internal tools dramatically. For production-grade apps, plan to involve a developer for review—even if you built 90% of it yourself.

Why This Matters for Freelancers and Solo Owners Right Now

A TechRepublic cheat sheet published in May 2026 calls vibe coding the 'latest AI trend' and outlines the planning, testing, and security checks that separate successful builds from headaches. That tells me this isn't just a flash-in-the-pan: the conversation has shifted from 'can AI write code?' to 'how do I do this responsibly?' For solo business owners, that shift means the barrier is lower than ever to create custom automations—tools that used to require a paid developer for even a simple internal dashboard or automated email flow.

If you're a freelancer juggling client work, the ability to spin up a quick expense tracker or lead capture form in an afternoon, without hiring anyone, changes your cost structure and speed. The current wave of AI coding assistants (many accessible through a browser) makes it feasible, but you still need a methodology. That's what this guide focuses on.

Key Benefits, Limitations, and What the Latest Guides Agree On

Across the resources I looked at, three benefits stand out for non-developers: you can go from idea to working prototype incredibly fast, you don't need to memorize syntax, and you can experiment without deep technical training. The Google Cloud article emphasizes that the loop includes testing and refining, which is exactly how I'd approach building something for my own business—iteratively, with constant reality checks.

On the limitation side, hallucinations (the AI inventing plausible but wrong code), security gaps, and scaling issues are the most repeated. A Udemy course outline for non-coders mentions managing hallucinations, recognizing when developer handoff is needed, and using prompt templates. That aligns with what the Valletta Software guide says: success depends on how you prompt, what you review, and when you stop relying on AI alone. For a solo business owner, I'd interpret that as: vibe coding is fantastic for internal tools and experiments, but anything client-facing or data-sensitive needs an extra layer of human review.

What Vibe Coding Excels At Where You Need Extra Caution
Prototyping a dashboard or simple web app Storing user passwords or payment data
Automating repetitive spreadsheet tasks Building a public API without security review
Creating a quick internal expense logger Scaling to hundreds of concurrent users
Learning how code works by tinkering Deploying to production without testing edge cases

From Setup to Running Automation: A Step-by-Step Expense Tracker Example

Let's walk through a concrete example that a freelancer might actually build: a simple expense tracker that logs entries and could later tie into a spreadsheet. I'm assuming no prior coding setup. This isn't a tutorial I've personally published, but the steps follow the structured vibe coding process outlined in the latest guides.

  1. Pick an AI coding tool and environment: You'll need a tool that can generate and run code. Options include ChatGPT (with code interpreter), Claude (with artifacts), or a browser-based IDE like Replit with its AI assistant. For this walkthrough, I'd use a web-based IDE so you don't install anything. If I were setting this up, I'd open Replit (free tier), create a new HTML/CSS/JS repl, and turn on the AI assistant.
  2. Write a clear, step-by-step prompt: Don't just say 'build an expense tracker.' Break it down: 'Create a single-page web app with a form to add an expense (amount, category, date). Display a list of added expenses below the form. Store data in browser local storage so it persists on refresh. Add a simple total at the bottom.' That structured approach, recommended in the Valletta guide, gets better results than vague requests.
  3. Generate, test immediately, and log what breaks: Hit generate and run the app. Add a few expenses. Check if the list updates correctly. If something fails—say the delete button doesn't work—describe the issue to the AI: 'The delete button next to each expense doesn't remove the item. Fix it so clicking delete removes that entry and updates the total.' Run again. Keep iterating until the core feature is solid.
  4. Add a lightweight automation layer: To make this more than a toy, connect it to Google Sheets via a simple API (you'll need a Google Cloud project and an API key—use the placeholder approach and never hardcode real keys). Modify your prompt: 'Add an Export to Sheets button. When clicked, it should send all stored expenses as a POST request to a Google Apps Script endpoint. I'll replace the endpoint URL later.' This step simulates a real automation workflow. You'll test with a placeholder first, then swap in the real URL once you've set up the Apps Script following Google's official guide.
  5. Refine error handling and UI niceties: Once the automation works, tell the AI: 'Add a loading spinner while the export is in progress, and show a success or error message. Also add basic form validation so no empty expenses are submitted.' This iterative prompt-refine cycle mirrors real software development, and it's where vibe coding shines—you're guiding the finish without writing the logic yourself.
  6. Share a test link and use it yourself for a week: Most online IDEs let you share a runnable link. Use the expense tracker for your own business for a few days. Note any annoyances, then go back to the AI and describe the improvements. That real-world testing is what separates a demo from a tool you'll actually use. If you find a bug you can't fix, that's your signal to involve a developer, not a failure.

How to Decide Where Vibe Coding Fits in Your Solo Workflow

Not every problem needs an AI-written app. From the guides, I'd apply vibe coding primarily to internal tools, prototypes, and one-off automations that reduce your manual toil. For a freelancer, that might be a client project tracker, a quick invoice generator, or a meeting notes summarizer. For a small local business, it could be an appointment reminder that pulls from a Google Calendar.

Before you start, ask: Is this app handling sensitive data? Yes → plan for a developer review. Will it face the public internet? Yes → add security checks before launch. Is it something I'd pay someone to build? Yes → vibe coding might save you that cost if the output stays internal. If you're uncertain, start with a completely internal tool like the expense tracker we just walked through. That way, a mistake won't affect customers or violate compliance rules.

💡 Decision shortcut
Use vibe coding for tools that only you or your team will see. For anything client-facing, build a proof-of-concept with AI, then get a security review from a professional.

Checklist Before You Consider It Done — Common Pitfalls

Based on the common mistakes surfaces in the guides, here's a quick checklist I'd run through before I start relying on any AI-generated tool.

  • Did you test with real but non-sensitive data to catch edge cases?
  • Have you removed all hardcoded API keys and used environment variables or a secure config?
  • Does the UI handle errors gracefully (network failures, empty data, validation)?
  • If you used third-party APIs, did you set up rate limiting and error handling?
  • Have you read the generated code for anything that looks suspicious—especially external calls you didn't intend?
  • Is there a backup of your data, and can you revert to a previous working version?

💡 Security reminder
Even the best AI assistants can generate code with vulnerabilities. If you don't understand a block of code that handles user input or external requests, don't ship it. The Valletta guide is explicit about this: review, review, review.

Frequently Asked Questions

Do I need any coding experience to start vibe coding?

No, but you do need patience and a willingness to test, break, and describe problems clearly. The latest guides emphasize that good prompting and structured thinking matter more than knowing syntax. Start with a small internal tool and learn from the mistakes.

Can I build a client-facing web app with vibe coding alone?

You can prototype one, but before customers use it, you'll need security hardening that typically requires a developer's review. Use vibe coding to get 80-90% there quickly, then budget for professional help on the last mile if the app handles sensitive data or payments.

What's the biggest mistake non-developers make with vibe coding?

Over-trusting the first version. Many beginners stop testing after the initial success, but real-world usage surfaces edge cases. The structured loop from the Google Cloud guide—describe, execute, observe, refine, repeat—is essential.

Is vibe coding completely free?

Many AI coding assistants offer free tiers, but you might hit usage limits, especially if the tool runs the code for you. The platforms themselves may have free starter plans, but for regular use, you might eventually need a paid plan. Always check the current pricing before you commit.

How do I know when to stop vibe coding and bring in a developer?

If you encounter a bug you can't describe clearly, notice sluggish performance under load, or realize the app processes sensitive data in a way you don't fully understand, that's a signal. Don't force it—handoff is part of the process.

Sources and References

Wrap-Up

After reading this, the most useful next step is to try the expense tracker example using a free, browser-based IDE—adapt it to your own business need, whether that's logging mileage, tracking freelance hours, or cataloging client requests. Keep the official Google Cloud and Valletta guides open as you work; they fill in details I didn't repeat here. Finally, if your first attempt feels clunky, remember that the core skill is describing exactly what went wrong—that's the real value of vibe coding. Bookmark the versions that work, and don't hesitate to scrap and restart with a better prompt.